Saddle Height — What’s Right?
Finding the correct saddle height for your bike is critical for a good fit and healthy knees. Here are some popular methods. You’ll need to know your barefoot inseam for the first two. To calculate it, put a thin book between your legs with one side of the book against a wall. The book should exert firm pressure on your crotch. Remember to keep the book horizontal. Use a pencil to mark the wall at the top of the book. Measure the distance from the floor to this mark — that’s your inseam.
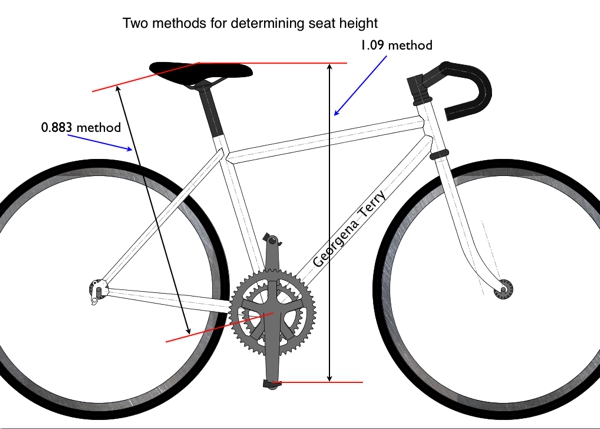
1). Multiply your barefoot inseam by 0.883. Adjust the saddle until the distance from the top of the saddle to the center of the bottom bracket is this length. This method is a good starting point for setting your saddle at the right height, but it doesn’t take into account the length of the crank arms, the shoes you wear or the pedals you use.
2). Using the same barefoot inseam length, multiply it by 1.09. This should be the distance from the top of the saddle to the pedal platform, when the pedal is at the bottom of its stroke, not when it is in line with the seat tube.
3). Put your bike on a trainer and get into your normal riding position. Put your heels on the pedals and back pedal. Raise the saddle height until you just start to rock side to side on the saddle, then back it down a tad. You can also just go for a ride on your bike to do this. With the sun at your back, you can watch your shadow to see when you start to rock.
I can pretty much guarantee if you try all three of these methods, you’ll come up with three different saddle heights. The third method, though, is the one that will probably get you on the way to a good fit faster than the other two. That’s because it’s addressing the “real” you on the bike. A measurement is just a number; it doesn’t know if your build is slight or your feet are big.
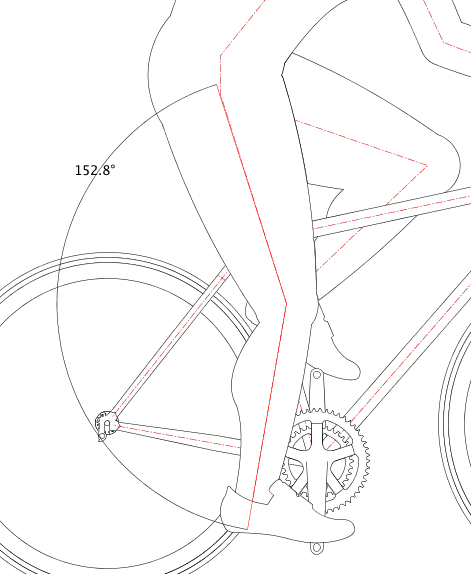
So start with the last method and set the saddle height. To tweak it from here, you’d be well advised to follow Andy Pruitt’s advice. He’s the hands down expert. When your pedal is at the bottom of the stroke he suggests a saddle height that will give your knee a bend of 150 – 155 degrees. Note that the angle of a perfectly straight leg would be 180 degrees. We want a slight bend to the knee. He uses anatomical landmarks to measure the angle, from the hip (greater trochanter) to the knee (lateral condyle) to the ankle (lateral malleolus). It’s tough for a novice to locate the landmarks accurately, so if you go this route, work with someone who can help you.
What you’re ultimately trying to achieve is a position that won’t tweak your knees, those precious commodities that put up with a lot from a cyclist. When they aren’t happy about the saddle height, they’ll give you a shout and you’d best heed it. If your knees hurt at the front, try raising the saddle a bit. If the back of your knees hurt, try lowering the saddle a bit.
Dressing for Cold Weather Cycling
Dressing for cold weather cycling is a challenge. Warm weather outfitting is comparatively easy. Shorts, for sure, leaving only the top — will it be a tank or a sleeveless or short sleeved jersey?
But when the temperatures dip, choosing the right garb is much trickier. It’s no longer just a matter of knowing the temperature. Is it a sunny day, a cloudy day; is it calm or windy? And the Big Unknown: will you start out in one set of conditions only to find the weather changes during your ride?
There’s an old adage that says you should start out feeling a little under-dressed because once you warm up, you’ll be fine. I say it’s better to err on the conservative side. Start warm and peel things off if you get too warm. When the weather’s cold, you can always get colder; you can’t necessarily get warmer. If you ride fast to stay warm, you may create your own freezing wind chill in the process. Oh — pay attention to the wind direction. On a cold day, I prefer to ride out against the wind and come back with the wind.
The engineer in me likes to see concepts reduced to nice tidy equations, charts and diagrams. So, for my benefit (and hopefully for yours), here are some guidelines for dressing in a variety of conditions. This image represents wind and sky conditions at four different temperatures. The letters in the image correspond to my suggestions of what to wear.
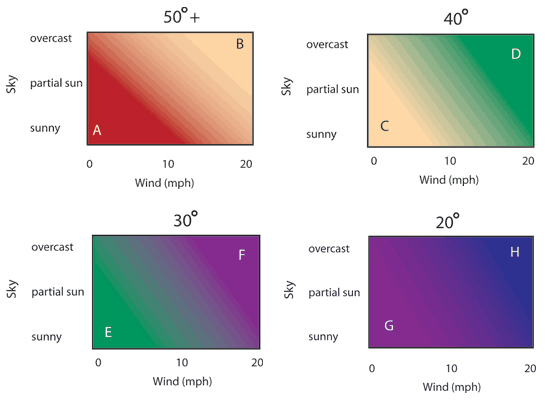
Condition A (50 degrees, full sun, no wind)
Lightweight tights, short sleeve jersey, long sleeve base layer, short-fingered gloves.
Condition B (50 degrees, overcast, 20 mph wind)
Lightweight tights, short sleeve jersey, long sleeve base layer, windbreaker, short-fingered gloves.
Condition C (40 degrees, full sun, no wind)
Heavyweight tights, lightweight long sleeve jersey, short sleeve base layer, windbreaker, long-fingered windblock gloves, wool socks.
Condition D (40 degrees, overcast, 20 mph wind)
Heavyweight tights, lightweight long sleeve jersey, long sleeve base layer, thermal windbreaker, long-fingered windblock gloves, wool socks.
Condition E (30 degrees, full sun, no wind)
Heavyweight tights, thermal long sleeve jersey, long sleeve base layer, thermal windbreaker, long-fingered thermal gloves, wool socks, shoe booties.
Condition F (30 degrees, overcast, 20 mph wind)
Heavyweight windblock tights, thermal long sleeve jersey, long sleeve base layer, thermal windbreaker, helmet beanie, long-fingered thermal gloves, wool socks, shoe booties.
Condition G (20 degrees, full sun, no wind)
Heavyweight windblock tights, thermal long sleeve jersey, long sleeve base layer, thermal vest, thermal windbreaker, helmet beanie, long-fingered thermal gloves, wool socks, shoe booties.
Condition H (20 degrees, overcast, 20 mph wind)
Heavyweight windblock tights, thermal long sleeve jersey, long sleeve base layer, thermal vest, thermal windbreaker, balaclava, long-fingered thermal gloves, wool socks, shoe booties. (Better yet, stay inside and curl up with a good book!)
Triaxial tension in a lugged steel bicycle frame
It’s an unexpected marvel of nature: the weakest chain in the link can hold its own with the stronger links. But this blog isn’t about chains; it’s about a lugged steel bicycle frame. In an earlier blog, I described the difference between a lugged frame and a TIG welded frame.
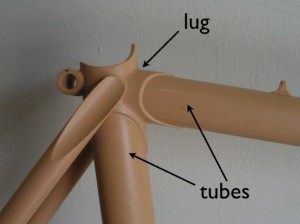
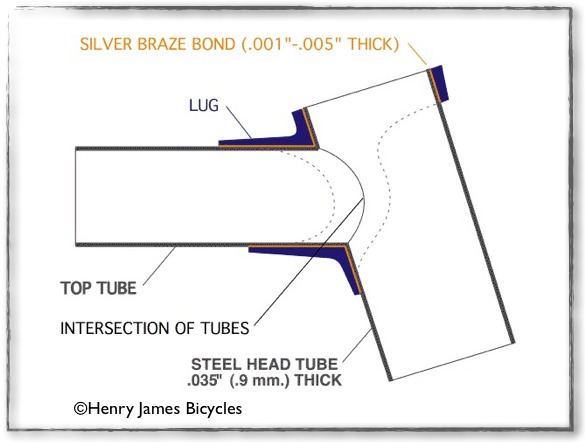
This frame is primed and ready for painting. This photo shows the seat tube lug.
When lugs are used as sleeves to join the tubes of a bicycle, everything is joined with a metal filler, usually brass or silver. When I built frames, I used a silver alloy metal. Silver will flow into the very small gap (from 1 to 5 thousandths of an inch) between the lug and the tube and, like glue, hold everything together.
One way of measuring the strength of a material is its tensile strength. Very loosely speaking, tensile strength refers to how much force can be applied to a material before it starts to deform and “break”. All you need to know for this blog is that higher numbers mean stronger materials. An investment cast lug and steel tubing have a tensile strength of about 120,000 psi (pounds per square inch) and the silver alloy (the “glue”) has a tensile strength of about 70,000 psi.
When the tensile strength of steel joints properly brazed with silver were tested, the joint was able to withstand a stress of 120,000 psi … even though the silver “glue” holding the joint together had a tensile strength of only 70,000 psi.[1] How is this possible?
The science behind this still isn’t completely understood, but it’s been hypothesized that the brazing filler material is so constrained by the lug and tubing around it that it can’t “slip” along the tiny, tiny little planes in its atomic structure.
Another theory has to do with the area of the filler material. Think about pulling on either end of a metal rod. As you pull with more force, the rod stretches before it finally breaks. If you measured the area of the rod before and after stretching, you’ll find it becomes smaller. Perhaps a drawing will help:
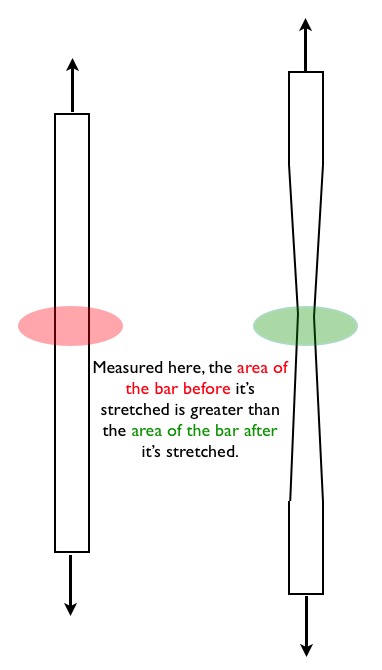
Because the brazing material is constrained by the lug and tube around it and has nowhere to go, its area can’t change. Materials engineers refer to it as being in a state of “triaxial tension”. Simply put, the effect of this state is to make the brazing material stronger.
This is one of the many things that makes engineering and bicycles so fascinating.
1 Handy and Harman Brazing Technical Bulletin No. T-3, “Strength of Silver Brazed Alloy Joints”, pp. 1- 2.


