
Beginning of Season Bike Maintenance Checklist
If you’re like many of us who live in the frozen north, your bike has been sitting around for weeks waiting patiently for you. While you still have a few weeks of quiet time on your hands, there are a few things you should check out on the bike before embarking on the new season. Get started on bike maintenance now while you have the time.

- Wax and clean the frame. You can use the same wax you’d use on your car. Clean and de-dust the frame first. Apply the wax and then buff it off with a soft, lint-free cloth. Don’t use a paper towel — it can scratch the finish. Make sure you get into all the little nooks and crannies around the braze-on bits. Keep the bike looking good by periodically spiffing it up with Lemon Pledge. (Note: if you have a carbon fiber frame/fork, check with your bike shop to make sure you don’t use any cleaning or waxing products that could damage the finish. Plain old water always works!)
- Check the tires for wear. Wipe the tire down with a damp sponge and then look for little shards of grit and glass that embed themselves in the tire, just waiting for a chance to cause a flat. Using a knife with a fine blade, you can pry these out (wear eye protection). Inflate the tires to the recommended pressure, which is stamped on the side of the tire. If the tires have more than 1500 miles on them, consider replacing them. You get what you pay for with tires, so get the best. They are your only contact points with the road!
- Brake pads eventually wear out, so check them to make sure they are still within the manufacturer’s recommended range. Really old pads may have a lot of material on them, but they dry a bit with age and don’t stop as well as new pads.
- Give each wheel a spin and make sure it’s true (not wobbling from side to side) and round (no hops or dips when viewed from the side). If they need a tweak, take them into your local bike shop.
- Lubricate your chain. It’s a dirty job, but when it gets too worn out, the shifting degrades. A wax product like White Lightning is clean, easy to apply and, if used enough, will clean your chain and keep it clean.
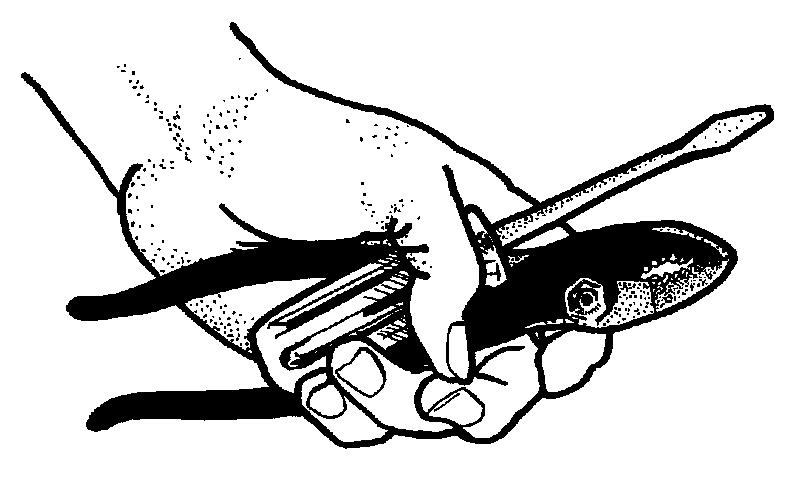
- Check your chain for wear. It’s best to replace the chain before it get so worn that it wears out the cassette cogs. It’s much cheaper to replace just a chain than a chain and a cassette. This video will show you how to check chain wear with a ruler.
- Use a light oil to lubricate the pivot points on the front and rear derailleurs. Apply the oil and then shift gears a few times which will move the derailleurs and distribute the oil.
- Run the bike through all the gears to make sure it’s shifting properly. If you put it away for the winter with a shifting problem, it won’t have self-healed! If there’s a problem, get it squared away now.
- Spin the wheels and squeeze the brake levers to make sure your brakes are operating properly.
- Change the handlebar tape. If the bike looks clean and new, you’ll ride faster.
- Check the contents of your tool bag. Spare tubes? Tire irons? Allen wrenches? If you took something mission-critical out after your last ride, make sure you put it back!
- Keep a journal — especially if you’re maintaining multiple bikes. Make a note of the date, the bike’s mileage and what you did. This really helps when you can’t remember if you lubed the chain recently or checked the tire pressure.
Enjoy the new riding season!
(This blog is also posted on Women’sCycling.ca.)
Worn Bicycle Chain and Cassette
Question of the week: “This past May I bought a hybrid bike. Now, at 2300 miles, I already need a new cassette. The bike shop said it’s all the miles I put in. How many miles can a cassette take?”
A cassette can take a lot of miles. But how many depends on how much care you give your chain. There’s this myth that when you replace your chain, you should also replace your cassette. That’s only true if you’ve really worn your chain out. The pins that connect the chain links wear over time, causing your chain to get longer. After a while, the shifting gets sloppy and inefficient and the chain starts to deform the cassette cogs and the chainrings.
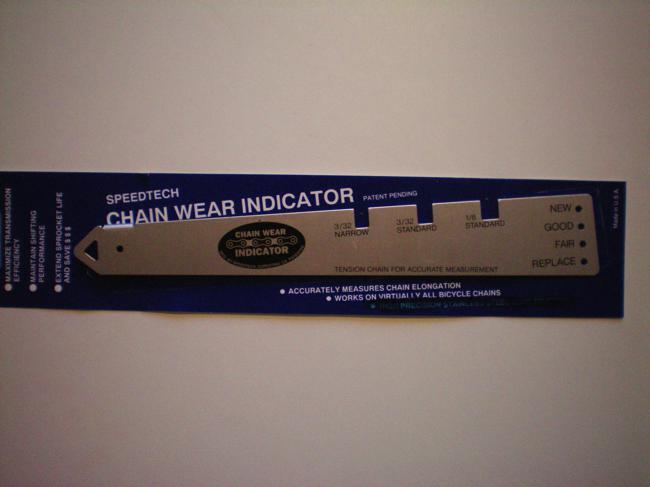
The trick is to replace the chain before it gets too worn. You can purchase an inexpensive chain gauge which lets you check the wear of the chain. By replacing the chain before it reaches the “replace” point, you can continue to use the same cassette. Everything is expensive these days, but replacing just the chain is a lot less expensive than replacing the chain and the cassette.


So, the name of the game is to keep that chain going for as long as you can. That means cleaning it and lubricating it properly. The rider who sent in this question admitted to riding in the rain a lot and not paying much attention to her chain. Both the worn bicycle chain and the worn cassette died an early death. I’ve ridden the same cassette over 10,000 miles by caring for the chain and replacing it twice.
Note: The chain gauge shown here is no longer made. But check out Park Tool’s CC-3.2 Chain Wear Indicator. It’s inexpensive and works well.