Worn Bicycle Chain and Cassette
Question of the week: “This past May I bought a hybrid bike. Now, at 2300 miles, I already need a new cassette. The bike shop said it’s all the miles I put in. How many miles can a cassette take?”
A cassette can take a lot of miles. But how many depends on how much care you give your chain. There’s this myth that when you replace your chain, you should also replace your cassette. That’s only true if you’ve really worn your chain out. The pins that connect the chain links wear over time, causing your chain to get longer. After a while, the shifting gets sloppy and inefficient and the chain starts to deform the cassette cogs and the chainrings.
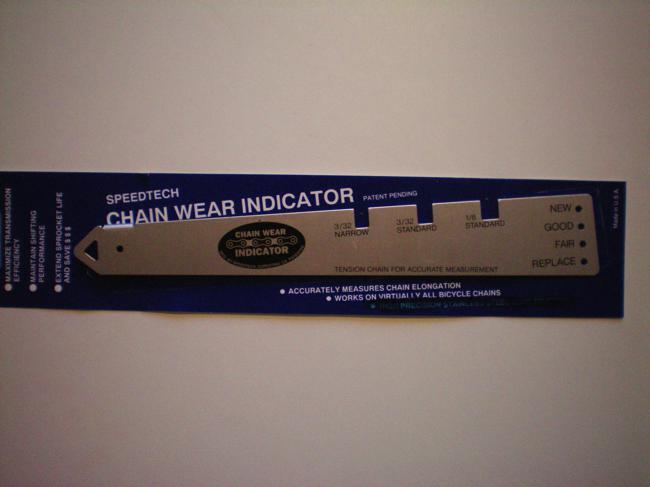
The trick is to replace the chain before it gets too worn. You can purchase an inexpensive chain gauge which lets you check the wear of the chain. By replacing the chain before it reaches the “replace” point, you can continue to use the same cassette. Everything is expensive these days, but replacing just the chain is a lot less expensive than replacing the chain and the cassette.
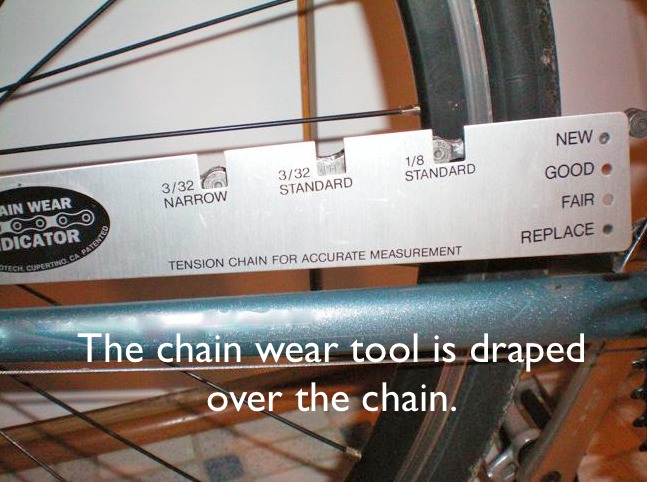
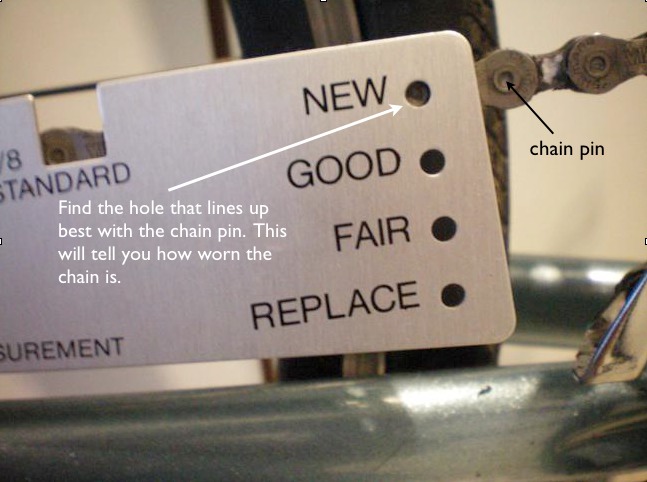
So, the name of the game is to keep that chain going for as long as you can. That means cleaning it and lubricating it properly. The rider who sent in this question admitted to riding in the rain a lot and not paying much attention to her chain. Both the worn bicycle chain and the worn cassette died an early death. I’ve ridden the same cassette over 10,000 miles by caring for the chain and replacing it twice.
Note: The chain gauge shown here is no longer made. But check out Park Tool’s CC-3.2 Chain Wear Indicator. It’s inexpensive and works well.
Lugged Frame or TIG-ed frame?
By default, the bicycles shown on my site are TIG welded. Even though you may see this kind of construction almost exclusively these days on both steel and aluminum frames, you may not have know what it’s called. Here’s a photo of a Coto Doñana Vagabond showing a TIG joint — seat tube, top tube and seat stays.
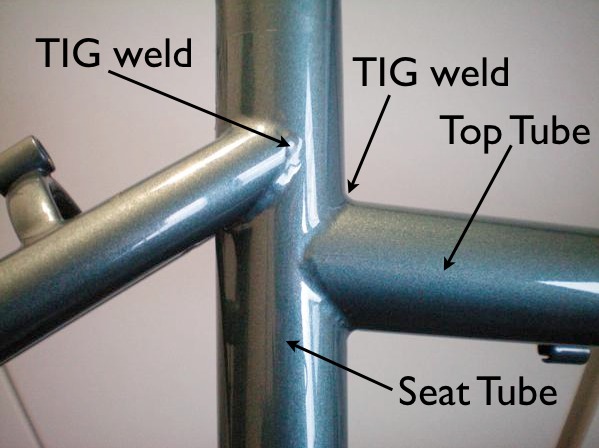
Example of TIG welding
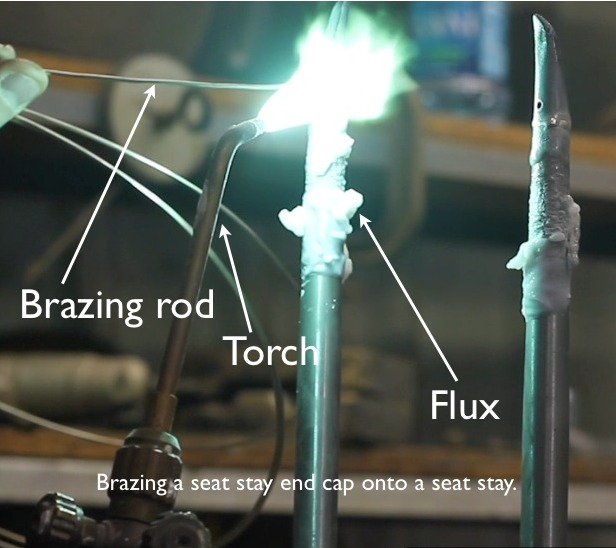
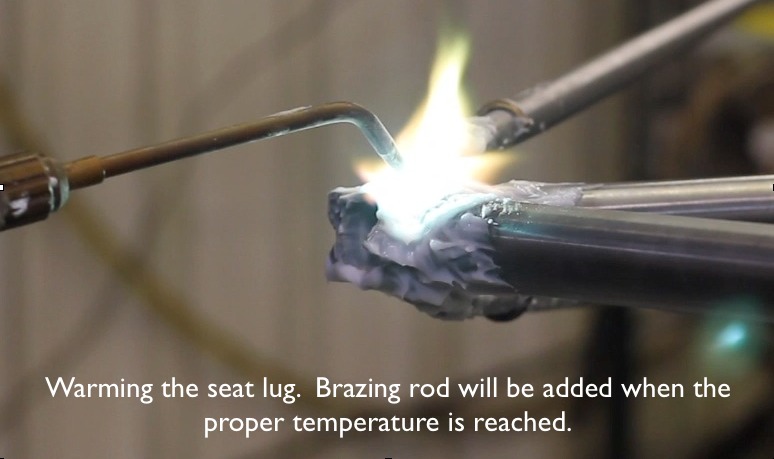
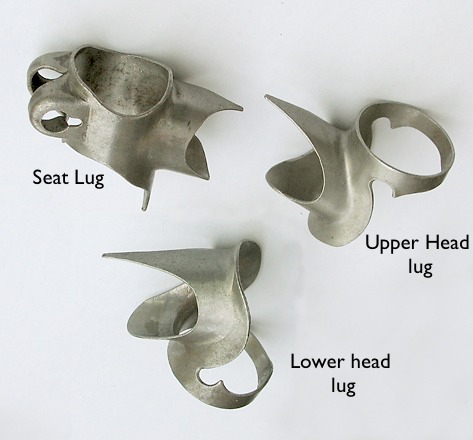
But another way of “putting the tubes together” is with lugs. Lugs are sleeves that hold the tubes in place. Brazing rod is melted into the sleeve and becomes a very strong “glue” that holds everything together.
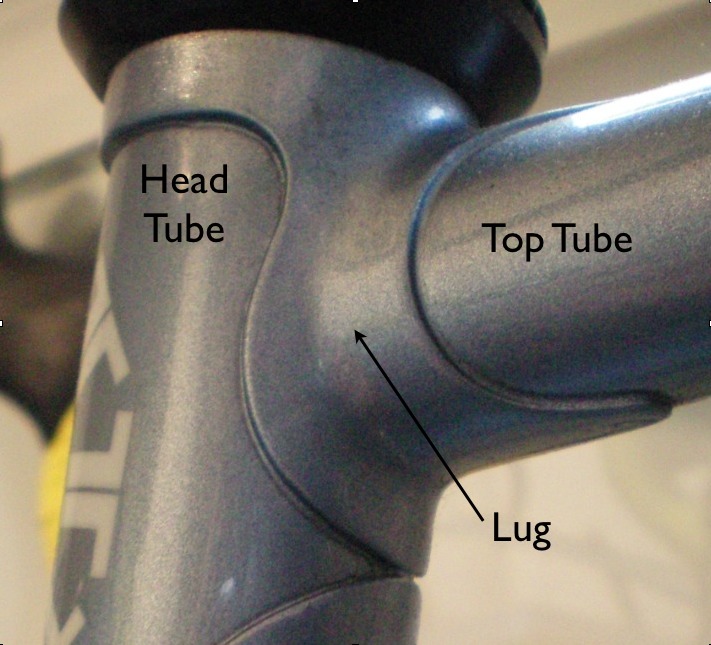
A head tube lug
Is one method better than the other? It just depends on your preferences. Aesthetically, a lugged frame looks classy and elegant. With some creative filing and cut outs, lugs can become works of art. If you’re thinking about purchasing one of my bikes and want lugs, I’ll be glad to oblige. They are well worth the extra cost.
Structurally, either method is fine. Typically, a TIG-ed frame will weigh a little less because it has no lugs. In theory, the “butts” (more wall thickness at the end than the middle of the tube) can be a little bit shorter since heat from TIG welding is more localized. With a brazed, lugged frame, the heat spreads over a greater length of the tubing, so the butts may be longer. Longer butts add weight.
Lugs typically come in set angles, so this may an issue if the frame design calls for something unusual. Since TIG-ed frames don’t use lugs, any frame angles will work.
In an upcoming post, I’ll talk about the “miracle” of lugs, tubing and brazing rod.
A Reader Asks: “How narrow a tire should I use to get a benefit from lower rolling resistance?”
Tires are one of the most fascinating aspects of the bicycle. They can make or break the comfort and efficiency of the ride.
Common sense used to have it that the narrower the tire was and the higher the pressure in the tire, the lower the bicycle tire rolling resistance would be. Which led us all to run the narrowest tires we could find with the pressure pumped to the max. Assuming you were riding on roads as smooth as glass, that might have made sense.
Truth be told, all things being equal (like pressure and tire construction), a wider tire has less rolling resistance. Huh? How can that be? Well, it’s all about the physical deformation of the tire. It’s that deformation that causes rolling resistance. When more of the tire deforms along the circumference of the tire, rolling resistance increases. Maybe a picture will help. Here’s how the patch size is determined. Imagine the bike tire is on a sheet of glass. You’re looking up from beneath it:
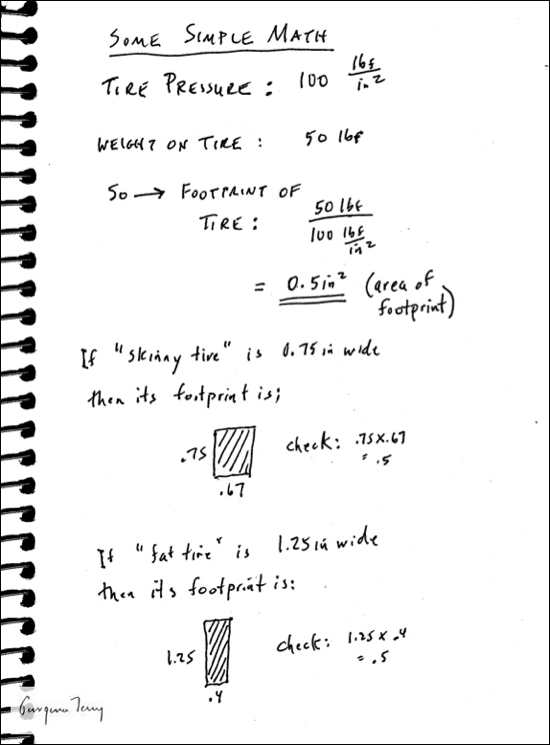
Here’s an exaggerated view from the side:
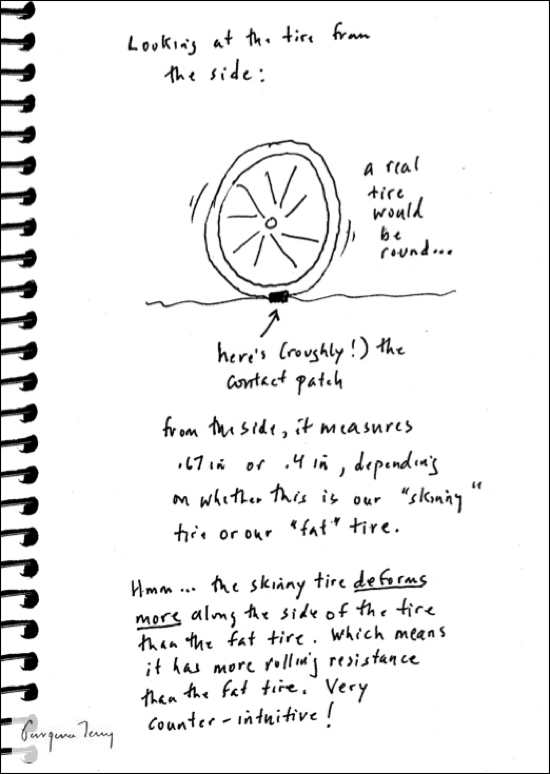
Now, some people really don’t want to give up their narrow tires for wider ones. I mean, it just wouldn’t look cool. So, the makers of bicycle rims have come to the rescue — they are now making wider rims! This allows the tire to “relax” (as in, “aahh, that feels better”), which makes the contact patch shorter and wider, just what’s needed to reduce rolling resistance.
Another source of rolling resistance comes from rough road surfaces. With the pressure pumped up to the max, the bike bumps around and its forward motion is hindered. Solution: lower the tire pressure so the tire works as a shock absorber, reducing these “suspension losses”. Jan Heine has a neat blog about some testing he did to find out how much more power a cyclist exerts to overcome the bumps.
The Gale Force bicycle uses Velocity’s A23 rim for just this reason. With a wider rim like this, not only is the contact patch optimized, but the tire can be run at a lower pressure so it absorbs road shock. This is because the tire’s sidewalls don’t distort as much as they would with a narrower rim, hence, the tire is a little “taller” and less prone to pinch flats.
Short Reach Brakes versus Long Reach Brakes
The best part of designing bikes is coming up with solutions. Often this comes about from an offhand comment from a rider. When I hear it, I realize I can bring more to the bicycle design than either of us planned on originally. Here’s an example. I recently built a Georgena Terry Gale Force bicycle for a rider who mentioned that the roads in her area were really rough. Steel bikes are great at absorbing road shock, but a wider tire can help as well.
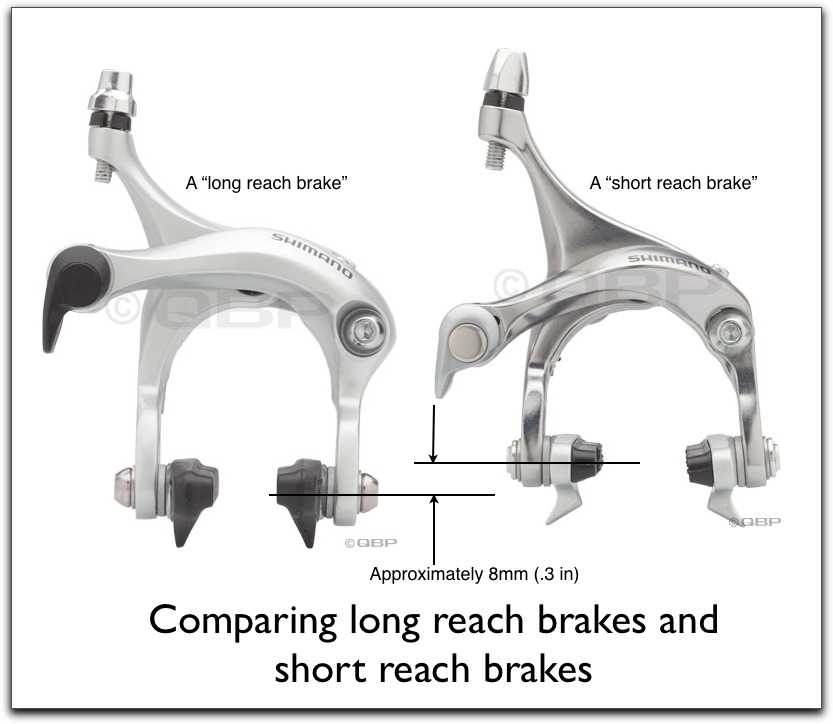
The problem is that a traditional road bike uses a “short reach brake”, which may limit the width of the tire that can be used. It’s often not possible to use tires wider than 25mm (1 inch) with this kind of brake. As the tire gets wider, it gets taller. And there’s the rub — literally. The wider tire is too close to the underside of the brakes. Imagine picking up a small stone and having it jam between the tire and brake. Not good.
“Long reach brakes” solve this problem. The arms of the brake are about 8mm (.3 inch) longer than the arms on short reach brakes. If a bike is specced with this brake, the rider can use wider tires. So when my customer mentioned rough roads, I offered her the option of long reach brakes so she could put wider tires on her bike. A simple solution that added versatility to the bike. Unfortunately, you can’t just swap out your short reach brakes for long reach brakes to solve this problem. The bike has to be built for one style or the other.
Does a Small Front Wheel on a Bicycle Make You a Slow Rider?
One question I commonly hear is “Will I go slower on a bike with a small front wheel?”
The quick answer is “no”. Suppose we have two identical bikes, one with a 24″ front wheel and a 700c rear wheel and one with 700c wheels front and rear. If the gearing on the two bikes is the same, then one turn of the pedals will turn the rear wheel on both bikes the same amount and the two bikes will travel at the same speed.
It is true that smaller wheels have more rolling resistance because when the tire deforms under the weight of the rider, more of a small tire’s circumference will deform than that of a larger tire. But this resistance is tiny and not significant. A smaller wheel rotates more rapidly than a larger wheel, but it weighs less, so maintaining its momentum really isn’t an issue either.
So, if you ride a bike with a small front wheel and you feel slow compared to your friends, consider some other reasons why that might be the case. Perhaps they’re stronger than you are — not unlikely when comparing a man to a woman. Perhaps your bike doesn’t fit properly. Or maybe their bikes are substantially lighter than yours; this is more likely to have an effect during rides in hilly rather than flat areas. And then there’s always the psychological side: if you think you’re fast, you are!
What Size 24″ bike tire do I need?
I get lots of questions about understanding and sourcing 24″ tires and tubes. We use this size on our smaller bikes. Here’s all you ever wanted to know about the 24″ size. And if it’s not — leave a comment and I’ll be glad to help.
First, let’s talk about tire designations. 24″ is a very broad term. It’s best to refer precisely to the tire/tube size. This is done by referencing the bead seat diameter — the diameter of the tire’s bead, which rests inside the wheel rim.
You can tell what tire size your bike uses by reading the impressions on the sidewall of the tire. Typically, they will look like this: XX-YYY. The first two numbers are the width of the tire in millimeters and the second three numbers are the bead seat diameter in millimeters. This applies to all sizes of tires, not just 24″.
For instance, if your sidewall reads 25-520, your tire is 25mm wide (about an inch) with a 520mm bead seat diameter. Armed with this information, you can order the correct tire/tube for your bike.
This tech page from Schwalbe explains much more about the size markings on tires.
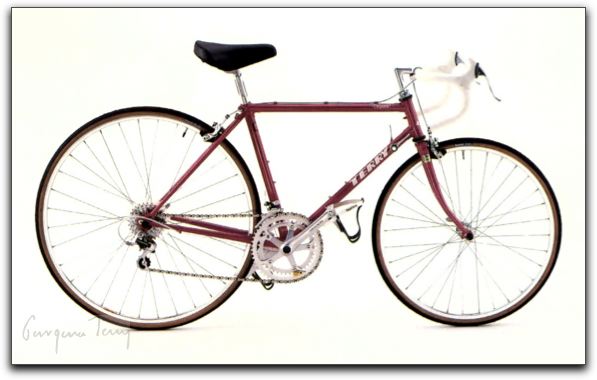
Terry has used two 24″ road sizes — 600A, with a bead seat diameter of 541mm and 24″, with a bead seat diameter of 520mm. The 541 size was used very briefly on only one Terry model — the Precision — for a limited time in 1985 – 1986. Later Precisions and all other Terry road bikes which are built with a 24″ front wheel use the 520 size.
Terry hybrid/mountain bikes using 24″ wheels front and rear have a 507 bead seat diameter.
ROAD BIKE TIRES/TUBES
Most Terry bikes use 24″ wheels with a 520mm bead seat diameter.
Sources:
Terry Bicycles carries a variety of 24″ (520) tires/tubes which can be found here.
Your local bike dealer can order 520 tires/tubes from Quality Bicycle Products, 800-346-0004 (wholesale only).
Here is a list of some 24″ tires that are available:
Panaracer Pasela 25-250
Terry Tellus 32-520
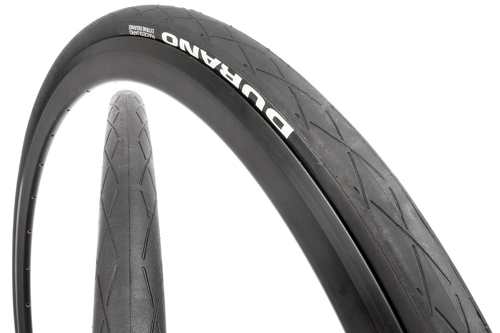
Schwalbe Durano 23-520
Older Terry Precisions used a tire size popularly called “600A”, which has a 541 bead seat diameter.
Source:
Schwalbe RightRun 25-540 (part number 10282387). More information available here.
The Schwalbe RightRun comes closest to the Wolber Rallye 22mm tire originally specced on the Precision. The fit is quite tight (because it’s 1mm smaller than the original Wolber), but it will work. Schwalbe also carries presta valve inner tubes (part number 10519213) which can be found here.
HYBRID BIKE TIRES/TUBES
Tire Source:
Schwalbe Kojak 40-507 (1.5″ wide). This tire is a slick, but rides beautifully! Unless you’re on gnarly roads, it’s the best. – Information can be found here.
Schwalbe Marathon Plus 47-507 (1.75″ wide) A very robust tire. Not light, but bomb-proof! – Information can be found here.
Inner Tube Source:
Schwalbe offers a variety of 507 inner tubes with either presta or schrader valves — AV10 and SV10. See here for more information.
REPLACEMENT WHEELS (520 or 507 size)
Do you need a replacement road or hybrid wheel? You or your dealer can obtain these from Velocity USA (800-453-6126). Velocity supplies all the wheels for my hand-built bicycles.
Gobsmacked! Weight and rotational inertia!
I’m “gobsmacked”, as the Brits would say. A few weeks ago, I took a week off to ride my bike. In place of my Coto Doñana Tour, I rode a vintage lightweight steel bike with 650c wheels. For this trip, I wanted a bike that was a little lighter and livelier. And indeed it was livelier — with every punch of the pedals, the bike leapt forward. Amazing what a light ride can do for you.
Or can it? Upon my return home, I weighed both bikes. Gulp…my prized 650c bike is a full pound heavier than my Coto Doñana Tour . Okay. How about the wheels? They’re the same weight even though the 650c bike uses Schwalbe Ultremo 23mm tires and the Tour uses Panaracer T-Serve 32-559 tires. This doesn’t mean the wheels have the same rotational inertia, though. Intuitively, my guess is the 650c wheels have less inertia. But is it enough to account for the “suppleness” of the 650c bike? Or is this a case of mind over matter?
About the same time I was pondering this, Velo magazine’s tech editor, Lennard Zinn, ran a column answering a reader’s question about the importance of bike weight. That has since blossomed into quite a discussion on the topic, taking many interesting twists and turns. How important is frame weight? How important is wheel weight? What about the weight of the rider??? I’ve referenced links to these articles at the end of this blog.
It’s hard to really summarize the discussion since so much information was shared. But the gist of it went like this: weight is important, but maybe not as important as we’ve been led to believe. If you generate x watts of power going up a hill, those x watts will get you up the hill faster on a lighter bike. How much faster? It depends on the weight of the two bikes. And let’s not forget the weight of the rider — the amount of power a light rider can generate is typically less than that generated by a heavier rider. So what’s the tradeoff in weight and power generated? That’s where it starts to get a little murky. And…the biggest factor: how well does the bike fit? Do you think that has a role to play in your power output? You bet!
Wheel weight falls into its own little piece of the puzzle. We all know a wheel is harder to accelerate when its mass is further outboard ( think “flywheel” for the ultimate hard to get started wheel). In physics terminology, a wheel with more “rotational inertia” takes more oomph to get started than a wheel with less rotational inertia. But how much? Marketers like to think it’s a lot, but physicists aren’t so sure. At least not in the general scheme of things.
No one does a better job of not mincing words than Jobst Brandt when it comes these matters, so I’ll let him have the last enticing thought: “Although it seems daunting, when another rider pulls away on a hill…, these accelerations, except in standing starts, are so small as to make the rotating mass story a hoax.”
References:
Does Bike Weight Matter?
Does Wheel Weight Matter?
Wheel Inertia
Jobst Brandt: The Weight Question
650c Wheels – A Little Bit of History
A few weeks ago, a friend dumped a pile of old cycling magazines on my doorstep. Two articles I read about 650 wheels were quite fascinating and I think provide some insight into our perception of 650 today.
When they debuted in 1989, 650c wheels were “the toast of triathlon” according to Dan Empfield. Even today, the tire is true to its heritage, predominantly available in narrow widths in more upscale brands as befits its role as a competitive tire.
Around the same time, Schwinn started playing around with a 26 inch wheel version of the Paramount, its hand-built top of the line road bike. Oddly, the Paramount designers used the 650B tubular tire. (The 650B clincher is a wide tire, associated with randonneur bikes, the polar opposite of the Paramount.) It’s not clear why Schwinn didn’t spec the 650c tire. Perhaps they felt the slightly larger (13 mm) diameter 650B had less of a visual shock…
What piqued Schwinn’s interest? The lower mass of the 650 wheel which makes it easier to accelerate than a heavier wheel. While today we usually associate 650 as a wheel used on a smaller bike to achieve a good fit for the rider, Schwinn’s designers didn’t seem at all driven in that direction. Indeed, when Bicycle Guide reviewed the Paramount OS-26, Schwinn provided the test bike in a whopping 61 cm size! The smallest available size was a 51 cm. Two of the bike’s reviewers mentioned that perhaps the 650 wheel would be best put to use on a smaller frame where it would be more proportionate to the bike size.
By 1993, the wind had started to go out of the 650c wheel with respect to tri bikes. Changes in rules and technology meant 700c could do the job just as well. But it would be remiss to say that because 650c is not the player it once was in tri bikes that the same is true for road bikes. We use 650c in road bikes to create a frame geometry that offers an elegant solution for smaller riders. In the tri world, 650c wasn’t about bike sizes — it was about weight distribution and a low tuck position on the bike.
In January, 1994, Road Bike Action reviewed a Radman D/650 road bike. Radman was known as a builder of tri bikes and began moving into the road bike market to compensate for declining tri bike sales. As with the Paramount OS-26, the lure of 650c was the light weight wheel which accelerated easily. The size of the test bike? 58 cm! The review concentrated on the “rush” of the bike’s acceleration. But a caption under a photo of the bike mentioned that 650c would allow an optimal geometry for frames under 50 cm.
Fortunately, someone was reading the small print and 650 soon became popular on many small bikes. I find the 650 size to be an excellent “bridge” between my 24″/700c and 700c/700c bikes. While rules and components may have allowed the 650c wheel to become “redundant” for most tri bikes, these changes have not affected the road bike world. 650c is still a key player in the world of bike design.
Refurbishing an Older Terry Road Bicycle
I’m often contacted by the owner of an older Terry bicycle who’s interested in purchasing a new bicycle. Terry bicycle customers are incredibly loyal — they want to continue riding the brand because of its fit and feel, but may be ready for new components and a lighter frame. While I’m always happy to sell a new bike, sometimes it makes sense to refurbish the old one.
A good bike shop will know exactly what can be done for your bike, but it’s often tough to get them to spend the time explaining this. While covering every model in detail would take pages, in this article I can at least give you some basic ideas to consider.
Frame and Fork
This is the heart of the bicycle. If it’s structurally damaged (minor dings, nicks and scratches not included), then a new bike is probably the best option. While steel lends itself to repair, the cost often outweighs the value of production frames like Despatch, Prism, Trilogy, Symmetry, Classic and Madeleine, to name a few. This may not be the case for a hand-built frame like Isis Sport, Precision, Isis Pro or Valkyrie.
Wheels
Oh so easy to replace and a wonderful place to get an instant return on your investment. A lighter set of wheels is easier to accelerate than heavier wheels. Every size wheel we use, from 700c to 24″ is available from Velocity USA in Michigan. Their prices are very reasonable and the quality of the wheels they build is excellent. Your dealer can purchase wheels from Velocity or you can order directly from them on their website.
Handlebars and Stem
If your bike is older, chances are it uses a quill stem (threadless stems are the norm these days). Consider yourself lucky. This style provides you with the ability to fine tune the reach to and the height of the handlebars. Nitto makes a variety of quill stems. If you’re looking for a new handlebar, consider the Nitto “Randonneur” bar. This handlebar is fantastic if you have wrist issues. It allows your hands to rest in a natural position on the bars, stress-free. The bar has a 25.4 mm clamp diameter, which will be compatible with older stems. With a simple shim, it can fit 26.0 mm stems as well.
Shift Levers
Really early Terry bikes had their shift levers on the down tube. An inexpensive way to move them to the handlebars is to use Shimano bar end shifters. You may need a new rear derailleur for compatibility, but it’s well worth it for the ease of use of bar end shifters.
Drivetrain
This can get very pricey! The standard these days is 10-speed (the number of cogs on the cassette on the rear wheel) although 9-speed is still mainstream, especially for touring bicycles with their ultra-low gearing.
To move up to 10-speed, you’ll need not only the cassette, you’ll also need a rear derailleur, chain, front derailleur and integrated brake/shift levers (unless you use bar end shift levers). You’ll probably also need to change the chainrings on your crankset since front derailleurs are very particular about the number of teeth on the chainrings and the chainring has to be compatible with the rest of the drivetrain. Frankly, you should upgrade the entire crankset to ensure compatibility throughout the drivetrain.
As I said at the beginning of this article, this a large subject to cover, but I hope this has given you some food for thought. If you want to discuss the particulars of your bike, you’re welcome to contact me for more information.
Have fun!
The Effect of Sloping Top Tubes
You probably never think about it, but at one time, it was rare for a bike to have anything but a level, horizontal top tube. In the early 90’s, sloping top tubes gradually found their way into the market and now they’re the norm.
One good thing that’s come about as a result of sloping top tubes is that we no longer get as “hung up” about how much clearance the rider has over the top tube. With horizontal top tubes, the rule of thumb is to have 1″ to about 2″ of clearance, depending on your riding style. It’s not uncommon for a rider to have 3+” of clearance over a sloping top tube.
Here’s a drawing to help you visualize the effect of the two tope tube “styles”. Note that the two bikes interposed over each other are identical except for the sloping top tube and the shorter seat tube on the sloping model. The same cyclist could ride either bike and have the same fit on each of them. She will have more clearance over the sloping top tube and more of her seat post will be showing.
From this drawing, you can see that, in terms of being able to clear the top tube, women with a wider range of inseams could “fit” this bike than one with a horizontal top tube. Indeed, when a bike has a horizontal top tube, the ability to clear it by a certain amount is critical. But with a sloping top tube, that parameter becomes blurred.
Now the focus turns to the relative positions of the saddle and the handlebars. If a sloping top tube means more women can “fit” a certain size, does it necessarily follow that the front end of that bicycle is also a good fit?
This is where worlds collide. If a rider with a shorter inseam finds the handlebars to be comfortable when set at the same level as her saddle, the taller rider may find the bars to be too low relative to her higher saddle height. No problem, you say — simply raise the bars.
It’s not always that simple. With carbon fiber and aluminum steerer tubes in forks becoming the standard, there’s a limit to how tall the spacer “deck” below the stem can safely be. 30 – 35 mm is pretty much the limit. Contrast that to steel steerer tubes, where 50 – 60mm of spacers isn’t out of hand.
One “fix” is to make bikes with taller head tubes, which raises the handlebars. Since it is rarely the case that a rider considers her bars to be too high, this is a palatable solution. My guess is tall head tubes are in vogue because when sloping top tubes became the standard, we lost comfort at the front end and realized we had to get it back.
What’s going on with the stem and handlebars is key to your comfort and efficiency. Unfortunately, it’s also an area that can be unyielding in terms of options. Stems do come in a variety of lengths and angles, but the option of raising the stem is often the deal breaker.

