Hamstrings and Cyclists
Before a customer purchases a bike from me, I ask her to complete a questionnaire that covers everything from measurements of herself and her current bike, her cycling aspirations and her flexibility. If you’ve followed the evolution of fitting techniques, you’ll know that flexibility is becoming as important as an inseam measurement in setting up a properly fitting bicycle.
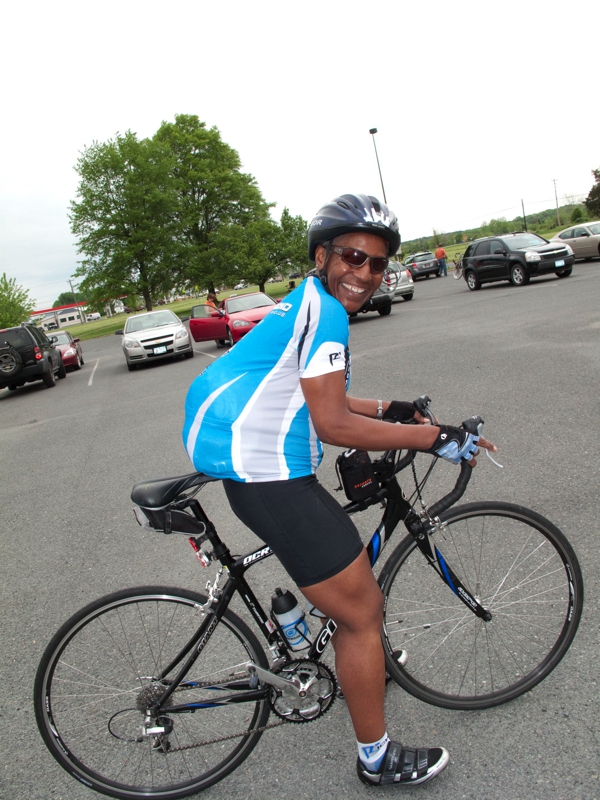
Achieving a “neutral” or flat back position can be difficult if the hamstrings are tight. These muscles attach to the pelvis at the ischial tuberosities (sit bones) and behind the knee joint. If they’re tight, they effectively pull down on the pelvis, causing it to rotate back. On the bike, this often leads to a rounded back, which can cause neck pain from rotating the head up to watch the road. The upside is that rotating the pelvis back reduces pressure on the sensitive “bits” that land on the front of the saddle.
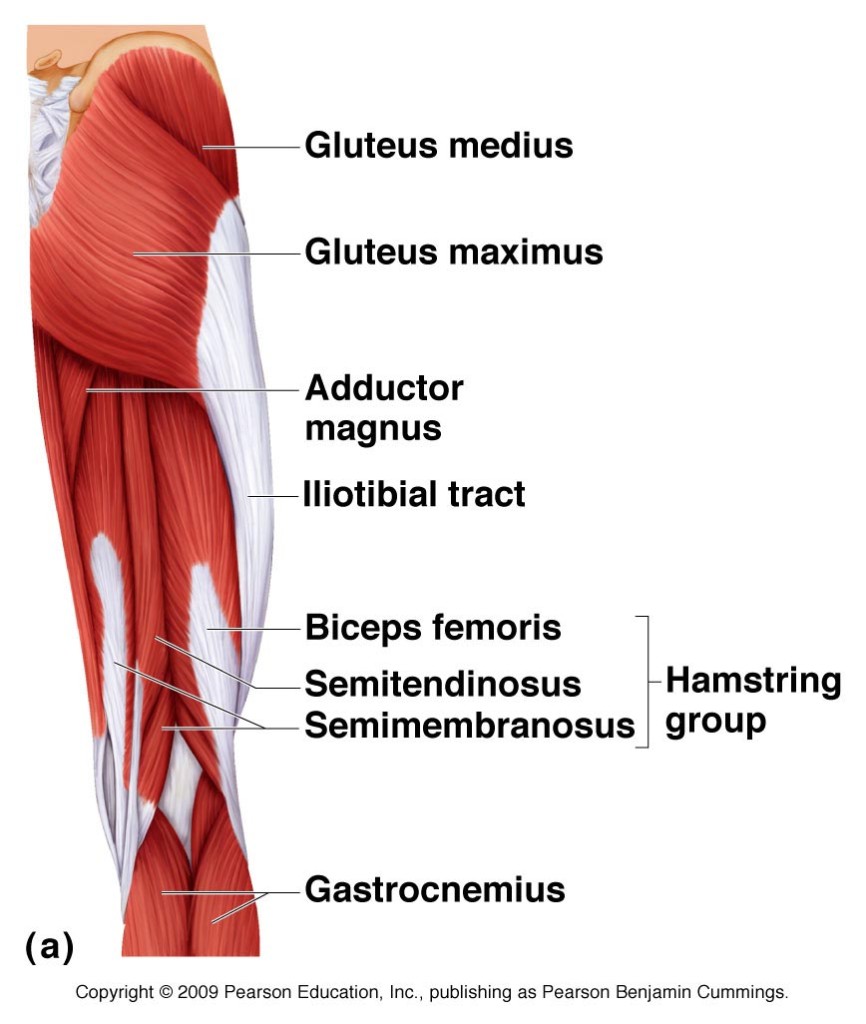
It’s easy to see how a rider who is flexible can have an advantage over a rider who is not as flexible, since the former will be able to get into a lower and longer position on the bike. In this position, the rider is more aerodynamic and can generate more power than a rider sitting upright. The pelvis rotates forward, allowing the spine to settle into a neutral position, reducing the possibility of low back pain. The downside is that there is more pressure from the saddle on the rider’s crotch.
Jo McRae, a trainer in the U.K., distinguishes between the “upper” and “lower” hamstrings. She maintains that as a cyclist pedals the upper part of the hamstring, which connects to the pelvis, is stretched more than the lower end of the hamstring at the knee. As a result of this dynamic motion, the upper end of the hamstring tends to be more flexible than the lower end. Specific stretching exercises are needed to address that area.
The correct saddle height can be determined through a variety of formulas. [1] Hamstring flexibility, or lack of it, affects saddle height. A rider who has tight hamstrings might not feel comfortable with the saddle at the high end of the range, but this can be addressed by stretching to improve hamstring flexibility.
Flexibility has a an important role to play in how the bicycle is set up most effectively for you. In the end, it’s up to you to decide what the proper trade-offs are between comfort and power.
- Notes
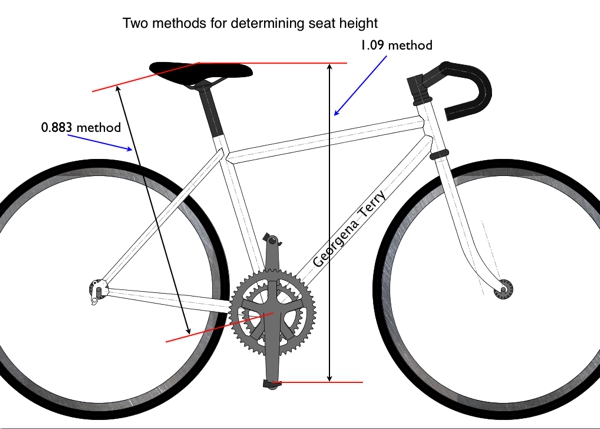
- Lemond method: Set the saddle height at 88.3% of the inseam length. Measure from the center of the bottom bracket to the top of the saddle.
- Hanley method: Set the saddle height at 109% of the inseam. Measure from the center of the pedal spindle to the top of the saddle.
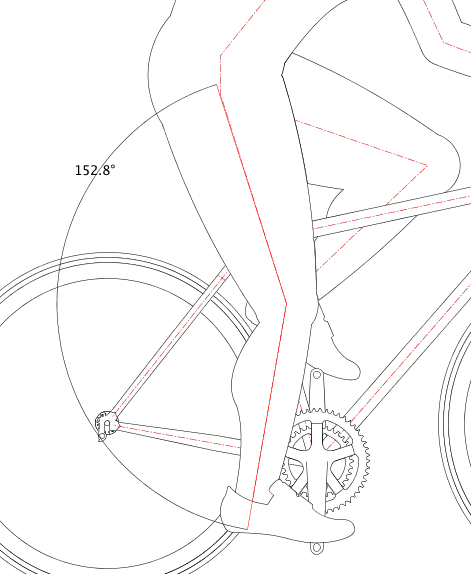
- Place the heel of the foot on the pedal when it’s at the bottom of the pedal stroke. Set the saddle to the height at which the knee is locked.Measure the angle between the lower and upper leg at the knee at the bottom of the pedal stroke. Most experts agree it should be between 145º and 155º.
This blog is also posted on Women’sCycling.ca.
A small bicycle for a small rider
One of the joys of my business is when I can help a rider find unique solutions to her problems so she can achieve her cycling goals.
The Goal:
Ride the Seattle to Portland Classic. 200 miles in two days including training seriously for the ride in the months prior to the event.
The Issues:
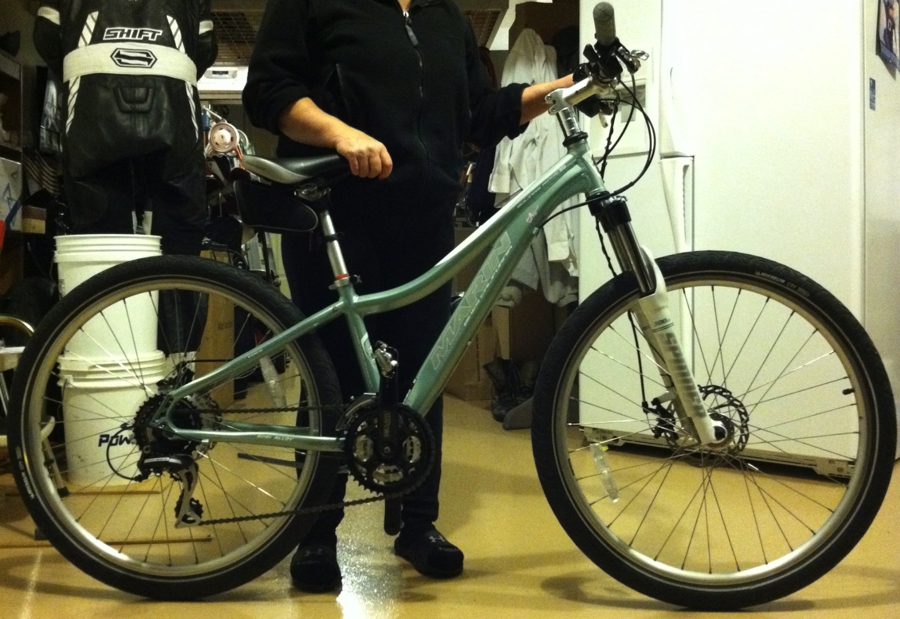
The rider is a petite woman in – 4′ 11″ with a barefoot inseam of 26″ – in need of a small bicycle. She has arthritis which affects her right thumb in particular. She prefers a flat handlebar. She’s having surgery to repair the thumb, which will only leave her about four months to train for the ride. Her current bike just wasn’t cutting it in terms of comfort or performance.
The Challenge:
A bike that won’t aggravate her hand situation, will fit her small stature perfectly and will get her to Portland and back with a smile on her face! Just finishing isn’t enough — I want her to finish and consider it one of the coolest rides she’s done. And the first of many more “bucket” rides to come!
The Solution:
A Coto Doñana Tour, with custom sizing and a very careful choice of components to accommodate her hands. And, oh yes, a custom color as well.
How It Was Accomplished:
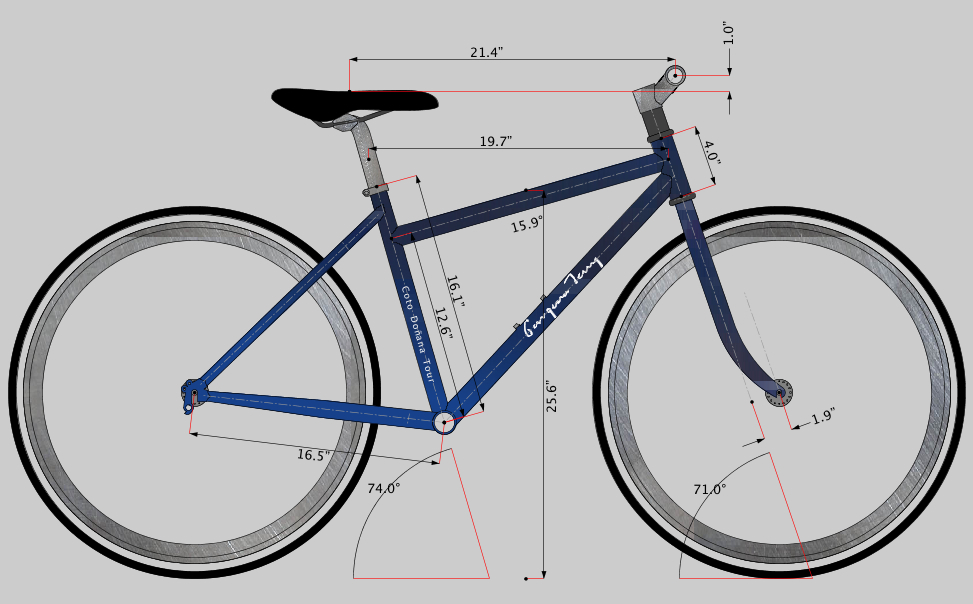
The first step was to scale down the smallest Coto Doñana Tour in order to give the rider clearance over the top tube. This was done partly by lowering the top tube where it meets the seat tube and by shortening the fork blades, which lowered the front end of the bike. The customer didn’t need the ability to run fenders on wide tires (which is a feature of the Coto Doñana Tour), so this was an option. With these changes, the stand over height was reduced by about an inch.
The handlebars on her current bike were 5″ above the saddle. This, in combination with a 22.8″ “rider compartment” (the distance from the center of the saddle to the handlebars) was still giving her some issues with too much pressure on her hands. This custom Coto Doñana Tour has a rider compartment of 21.4.” The handlebars are about an inch above the saddle.
I specced Grip Shift® shifters to relieve the stress on her hands. Since we knew the diameter of the shifters, she was able to verify that the dimension was manageable and comfortable.
The Happy Ending:
A successful STP adventure!
It was my privilege to see the bike and its owner in action on the Terry Sojourn bike tour this September. Like I said, my job is always fun!
Designing a bike around a 24″ wheel
Recently I was contacted by a customer who was concerned that my bikes using a 24” front wheel/700c rear wheel design were flawed. Wouldn’t the design put pressure on the neck and shoulders because the 24” bicycle wheel made the front of the bike lower than the rear?
Ah, if were only so simple as throwing a 24” bicycle wheel on a bike designed for a 700c wheel. If one picture is worth a thousand words, then four pictures must be even better.
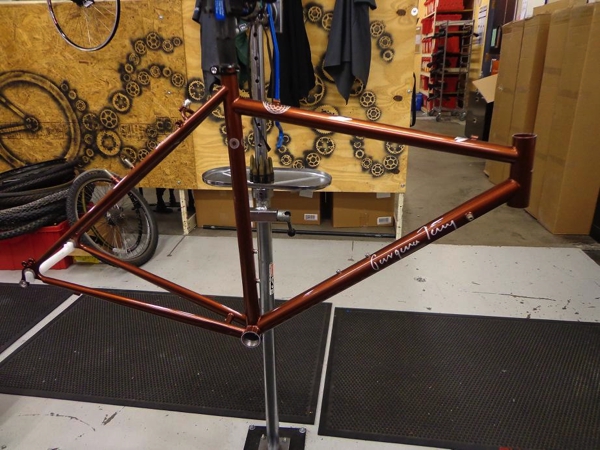
1). Here’s a bike with 700c front and rear wheels.
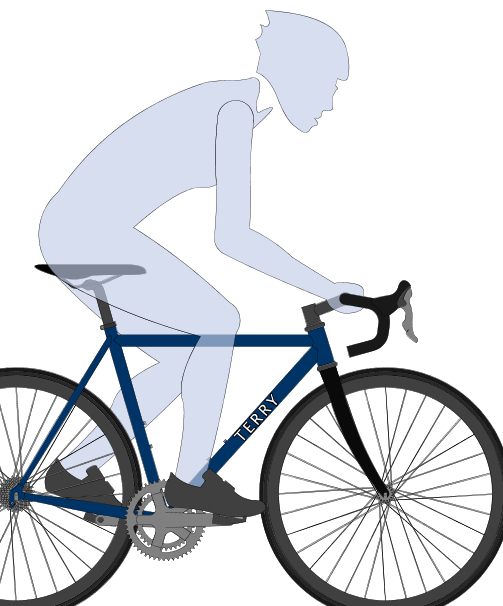
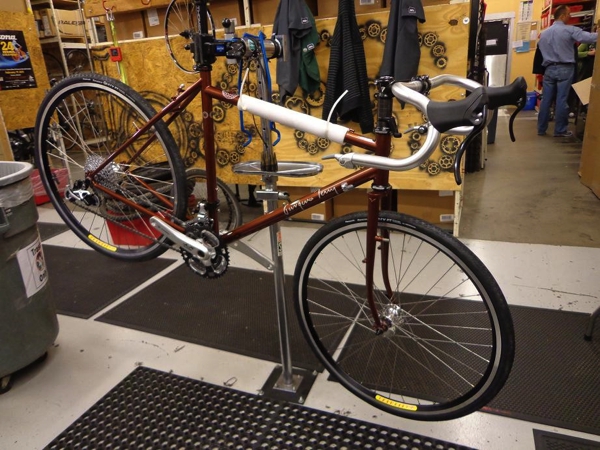
2). If the 700c front wheel is replaced with a 24” wheel and no other changes made to the bike, the picture below shows how it would look. Not only is the bike very low in the front, but the brake pads are far above the wheel. The rider would definitely feel not only pressure on her hands and shoulders, but she would feel the thrill of no front brake!
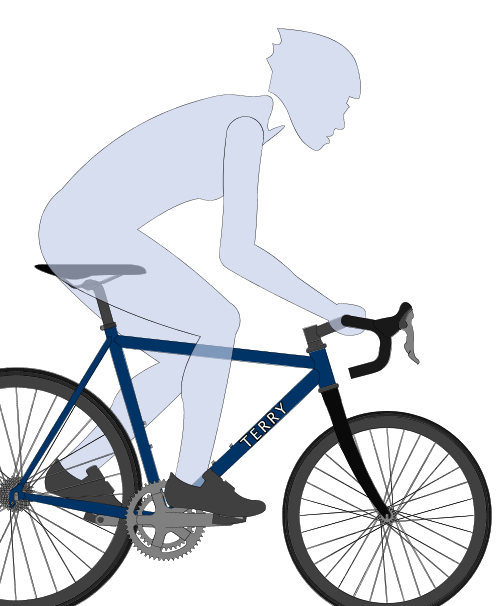
3). If the 700c wheel and fork is replaced with a 24” front wheel and fork, braking is restored, but the bike still “points down.”
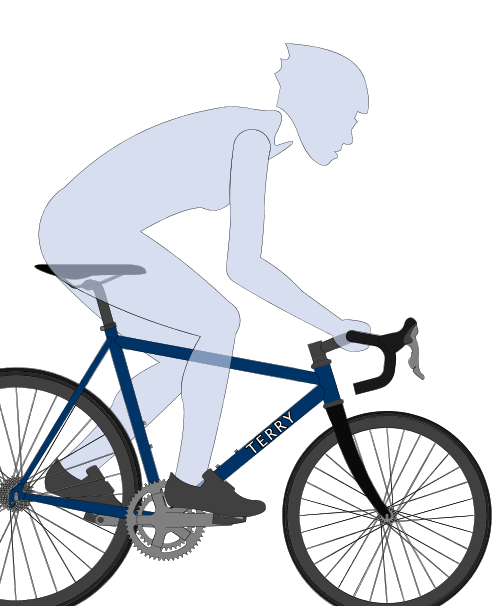
4). Here’s the right way to do it. The head tube on this bike is much longer than on the bike using twin 700c wheels. This keeps the front of the bike in the proper position so the top tube is horizontal again and the rider is in a normal position. Compare this to the first picture.
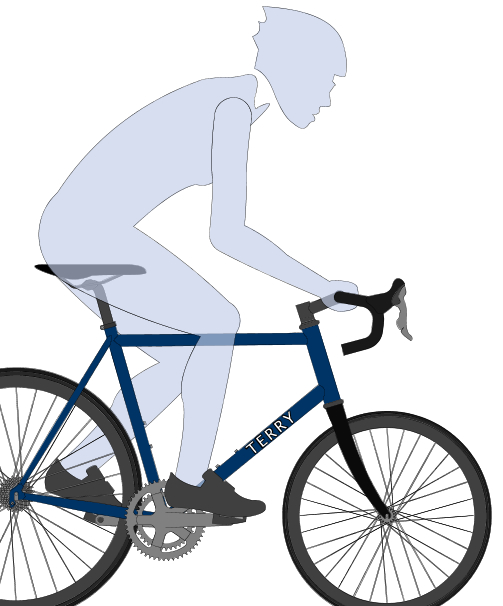
Bottom line: When a bike with a 24” front wheel is build this way, there is no design flaw. If the rider feels as though she is bearing too much force in her arms, the solution lies in tweaking the stem and handlebars.
Advertising to Female Cyclists
The May 15 issue of Bicycle Retailer and Industry News had an article by Megan Tompkins about advertising to female cyclists and how the industry can do a better job of appealing to them.
The gist of the article was that the industry markets to men. Advertising is peppered with rain, dirt, agony, sweat and misery. Just the kind of stuff that makes men want to buy! And typically the kind of imagery that turns women off.
Elysa Walk from Giant Bicycle noted ,”The visual cues that trigger emotional response in men and women are different. We market to men.”
I flipped through some magazines and picked out a few ads that speak to this issue.
Apparently the only part of this rider not ripped to shreds is his crotch, thanks to his saddle.

Who doesn’t like Spartacus? But will this really attract the newbie rider who thought cycling was going to be about enjoying a jaunt with friends?
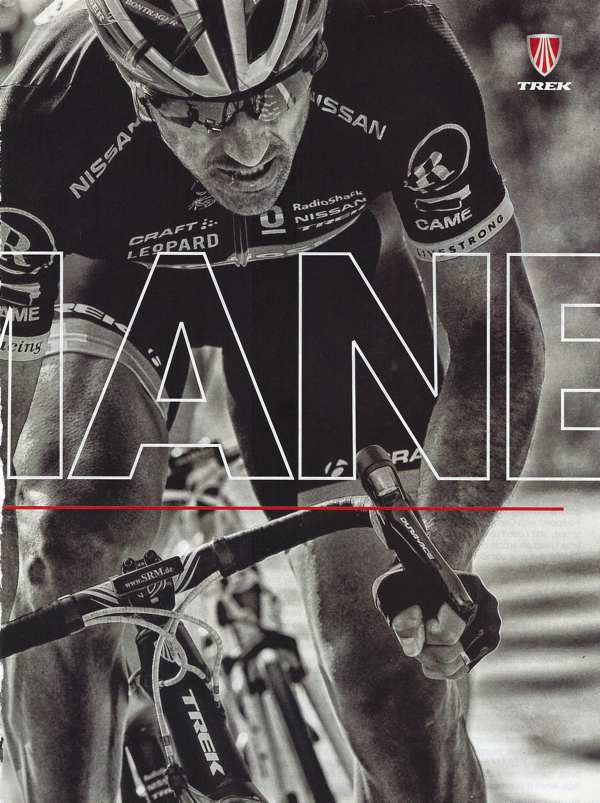
Even the sunglass companies have jumped on the pain bandwagon…and the gram bandwagon.

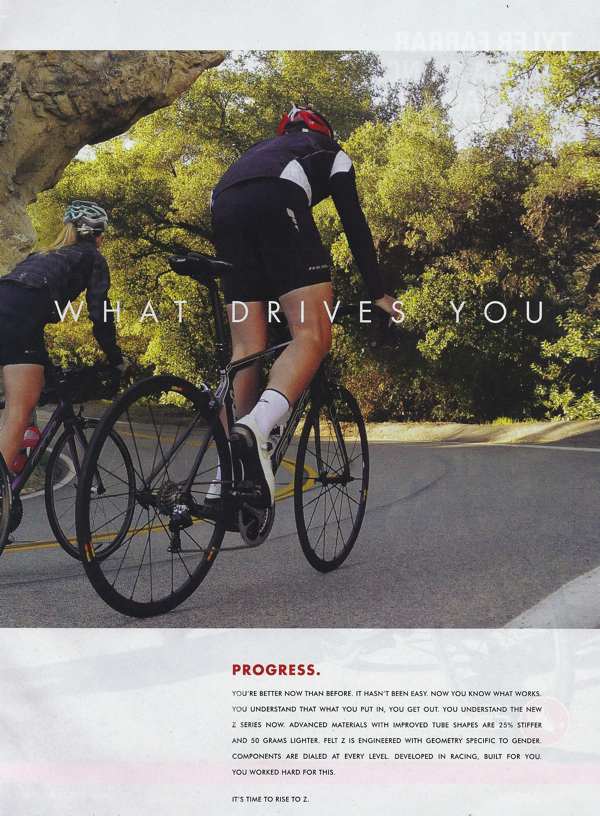
Here are some ads from companies who seem to “get it”. If the bicycle industry is indeed leaving $2 billion on the table by failing to appeal to women, as the article states, then these companies see the payoff.
Norco is a Canadian company. Two women, one man. How daring.

This is one page of a two page ad by Felt. Woman and men feature equally — just enjoying a good ride through some beautiful country.
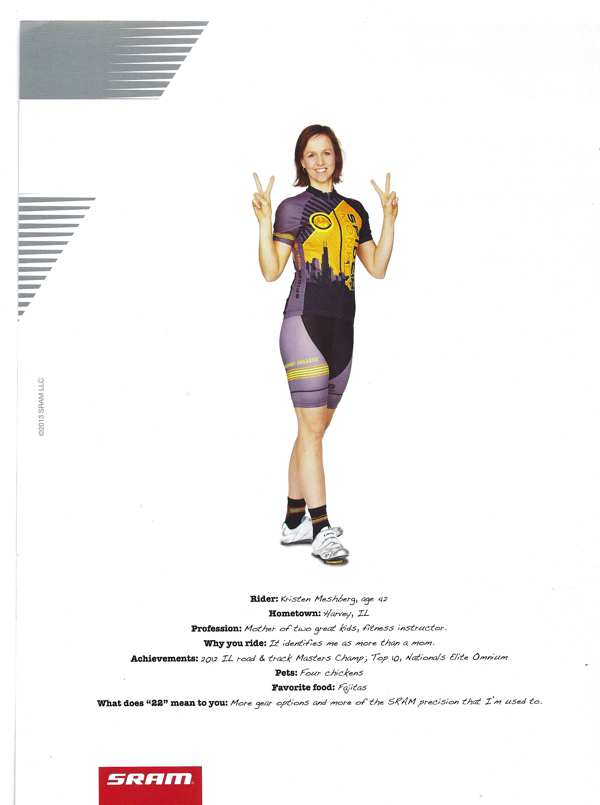
SRAM’s ad shows their recognition of the fairer sex. Every woman can relate to this cyclist.
Will the bicycle industry ever figure this out? Maybe they fear losing their male audience if they produce ads that appeal to women. I think they can have their cake and eat it, too. It’s just a matter of willpower. Something that seems to be in short supply.
How Important is the Bicycle Standover Height?
The bicycle standover height is really important! If you can’t stand over the top tube without touching it, you run the risk of hurting yourself when you stop quickly.
If the top tube is higher than you are, i.e. you have “negative” clearance, you’re an accident waiting to happen. Landing hard on a piece of steel, aluminum or carbon fiber tubing isn’t going to be a pleasant experience. You won’t “get used to it.”
Even if you just graze the top tube when you stand over the bike, you may still run into problems. The road surface isn’t always smooth. If you stop and put your foot into a divot in the road, you’ll be that much lower and you’ll run into the top tube. I know, you can always “lean the bike over”, but if you’re stopping unexpectedly, will you always remember to do that?
It’s too bad so many manufacturers neglect the petite rider. After all, she’s serious about her sport too and deserves the same good equipment as everyone else. Occasionally, a customer comes to me who is still an inch or so shy of fitting my smallest stock design. Ah, the beauty of a custom bike. Since I build to order, tweaking the geometry to fit that rider isn’t a problem, nor does it cost any more. You can’t put a price on your health and safety, so if you’re in the petite fit boat, consider a custom bike.
Saddle Height — What’s Right?
Finding the correct saddle height for your bike is critical for a good fit and healthy knees. Here are some popular methods. You’ll need to know your barefoot inseam for the first two. To calculate it, put a thin book between your legs with one side of the book against a wall. The book should exert firm pressure on your crotch. Remember to keep the book horizontal. Use a pencil to mark the wall at the top of the book. Measure the distance from the floor to this mark — that’s your inseam.
1). Multiply your barefoot inseam by 0.883. Adjust the saddle until the distance from the top of the saddle to the center of the bottom bracket is this length. This method is a good starting point for setting your saddle at the right height, but it doesn’t take into account the length of the crank arms, the shoes you wear or the pedals you use.
2). Using the same barefoot inseam length, multiply it by 1.09. This should be the distance from the top of the saddle to the pedal platform, when the pedal is at the bottom of its stroke, not when it is in line with the seat tube.
3). Put your bike on a trainer and get into your normal riding position. Put your heels on the pedals and back pedal. Raise the saddle height until you just start to rock side to side on the saddle, then back it down a tad. You can also just go for a ride on your bike to do this. With the sun at your back, you can watch your shadow to see when you start to rock.
I can pretty much guarantee if you try all three of these methods, you’ll come up with three different saddle heights. The third method, though, is the one that will probably get you on the way to a good fit faster than the other two. That’s because it’s addressing the “real” you on the bike. A measurement is just a number; it doesn’t know if your build is slight or your feet are big.
So start with the last method and set the saddle height. To tweak it from here, you’d be well advised to follow Andy Pruitt’s advice. He’s the hands down expert. When your pedal is at the bottom of the stroke he suggests a saddle height that will give your knee a bend of 150 – 155 degrees. Note that the angle of a perfectly straight leg would be 180 degrees. We want a slight bend to the knee. He uses anatomical landmarks to measure the angle, from the hip (greater trochanter) to the knee (lateral condyle) to the ankle (lateral malleolus). It’s tough for a novice to locate the landmarks accurately, so if you go this route, work with someone who can help you.
What you’re ultimately trying to achieve is a position that won’t tweak your knees, those precious commodities that put up with a lot from a cyclist. When they aren’t happy about the saddle height, they’ll give you a shout and you’d best heed it. If your knees hurt at the front, try raising the saddle a bit. If the back of your knees hurt, try lowering the saddle a bit.
Dressing for Cold Weather Cycling
Dressing for cold weather cycling is a challenge. Warm weather outfitting is comparatively easy. Shorts, for sure, leaving only the top — will it be a tank or a sleeveless or short sleeved jersey?
But when the temperatures dip, choosing the right garb is much trickier. It’s no longer just a matter of knowing the temperature. Is it a sunny day, a cloudy day; is it calm or windy? And the Big Unknown: will you start out in one set of conditions only to find the weather changes during your ride?
There’s an old adage that says you should start out feeling a little under-dressed because once you warm up, you’ll be fine. I say it’s better to err on the conservative side. Start warm and peel things off if you get too warm. When the weather’s cold, you can always get colder; you can’t necessarily get warmer. If you ride fast to stay warm, you may create your own freezing wind chill in the process. Oh — pay attention to the wind direction. On a cold day, I prefer to ride out against the wind and come back with the wind.
The engineer in me likes to see concepts reduced to nice tidy equations, charts and diagrams. So, for my benefit (and hopefully for yours), here are some guidelines for dressing in a variety of conditions. This image represents wind and sky conditions at four different temperatures. The letters in the image correspond to my suggestions of what to wear.
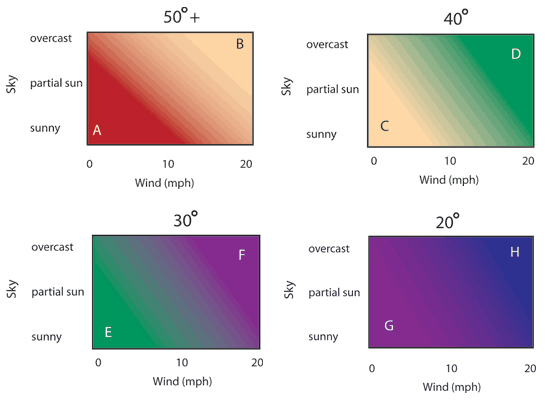
Condition A (50 degrees, full sun, no wind)
Lightweight tights, short sleeve jersey, long sleeve base layer, short-fingered gloves.
Condition B (50 degrees, overcast, 20 mph wind)
Lightweight tights, short sleeve jersey, long sleeve base layer, windbreaker, short-fingered gloves.
Condition C (40 degrees, full sun, no wind)
Heavyweight tights, lightweight long sleeve jersey, short sleeve base layer, windbreaker, long-fingered windblock gloves, wool socks.
Condition D (40 degrees, overcast, 20 mph wind)
Heavyweight tights, lightweight long sleeve jersey, long sleeve base layer, thermal windbreaker, long-fingered windblock gloves, wool socks.
Condition E (30 degrees, full sun, no wind)
Heavyweight tights, thermal long sleeve jersey, long sleeve base layer, thermal windbreaker, long-fingered thermal gloves, wool socks, shoe booties.
Condition F (30 degrees, overcast, 20 mph wind)
Heavyweight windblock tights, thermal long sleeve jersey, long sleeve base layer, thermal windbreaker, helmet beanie, long-fingered thermal gloves, wool socks, shoe booties.
Condition G (20 degrees, full sun, no wind)
Heavyweight windblock tights, thermal long sleeve jersey, long sleeve base layer, thermal vest, thermal windbreaker, helmet beanie, long-fingered thermal gloves, wool socks, shoe booties.
Condition H (20 degrees, overcast, 20 mph wind)
Heavyweight windblock tights, thermal long sleeve jersey, long sleeve base layer, thermal vest, thermal windbreaker, balaclava, long-fingered thermal gloves, wool socks, shoe booties. (Better yet, stay inside and curl up with a good book!)
Triaxial tension in a lugged steel bicycle frame
It’s an unexpected marvel of nature: the weakest chain in the link can hold its own with the stronger links. But this blog isn’t about chains; it’s about a lugged steel bicycle frame. In an earlier blog, I described the difference between a lugged frame and a TIG welded frame.
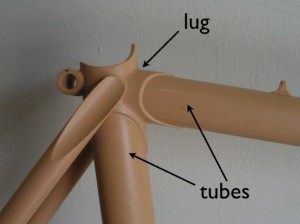
This frame is primed and ready for painting. This photo shows the seat tube lug.
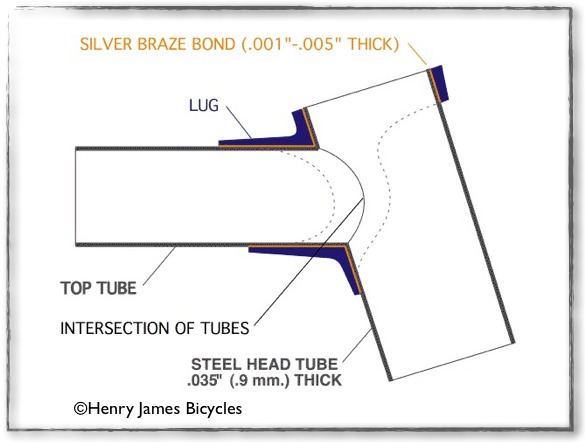
When lugs are used as sleeves to join the tubes of a bicycle, everything is joined with a metal filler, usually brass or silver. When I built frames, I used a silver alloy metal. Silver will flow into the very small gap (from 1 to 5 thousandths of an inch) between the lug and the tube and, like glue, hold everything together.
One way of measuring the strength of a material is its tensile strength. Very loosely speaking, tensile strength refers to how much force can be applied to a material before it starts to deform and “break”. All you need to know for this blog is that higher numbers mean stronger materials. An investment cast lug and steel tubing have a tensile strength of about 120,000 psi (pounds per square inch) and the silver alloy (the “glue”) has a tensile strength of about 70,000 psi.
When the tensile strength of steel joints properly brazed with silver were tested, the joint was able to withstand a stress of 120,000 psi … even though the silver “glue” holding the joint together had a tensile strength of only 70,000 psi.[1] How is this possible?
The science behind this still isn’t completely understood, but it’s been hypothesized that the brazing filler material is so constrained by the lug and tubing around it that it can’t “slip” along the tiny, tiny little planes in its atomic structure.
Another theory has to do with the area of the filler material. Think about pulling on either end of a metal rod. As you pull with more force, the rod stretches before it finally breaks. If you measured the area of the rod before and after stretching, you’ll find it becomes smaller. Perhaps a drawing will help:
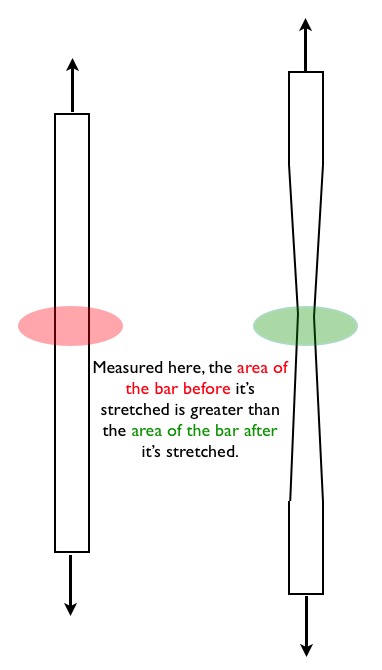
Because the brazing material is constrained by the lug and tube around it and has nowhere to go, its area can’t change. Materials engineers refer to it as being in a state of “triaxial tension”. Simply put, the effect of this state is to make the brazing material stronger.
This is one of the many things that makes engineering and bicycles so fascinating.
1 Handy and Harman Brazing Technical Bulletin No. T-3, “Strength of Silver Brazed Alloy Joints”, pp. 1- 2.

